Cheap balcony renovation with instructions - Calculate Now
In order to improve the construction quality as well as the visual appearance of a terrace or balcony, it is sometimes advisable to renovate or pave this area from scratch.
Depending on the type and appearance of the new paving, the newly designed outdoor area will have even more flair and its own charm. As attractive as the whole thing may look later on, it is easy to carry out the individual work steps. The only important thing is to take special care, especially during the preparations.
Nevertheless, a certain amount of time must be invested in this context. And the financial aspect also plays an important role. Those who save at the wrong end will sooner or later have to carry out extensive repair work.
Instructions for balcony renovation in steps:
- Completely remove the old covering
- Install a rain gutter plate with connection to the rain gutter drain of the house (drain from layer drainage mat).
- simple solution (not really recommended): create cove on the inside facing the house; expensive solution: complete drainage system
- Apply primer for moisture protection
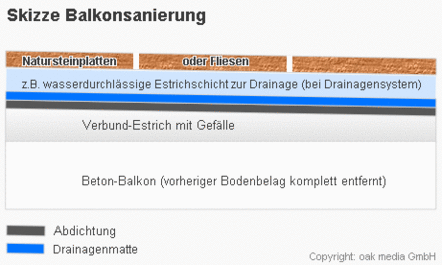
- Waterproofing: apply welded membrane or self-adhesive waterproofing material and lead it up to the cove and about 10-15 cm further (membrane should protrude).
- Place drainage mat and screed layer on top with a slope
- Position the tile or natural stone covering in the composite system.
 Prepare balcony substrate
After the terrace or balcony area to be renovated has been carefully measured and marked, a base layer about 25 to 30 centimeters thick is spread on the previously fixed substrate. This layer is best compacted using a vibrating plate.
A layer of paving sand, gravel or chippings up to five centimeters thick is then applied. A spirit level should be used for this purpose in order to achieve optimum results later. To ensure that rainwater or condensation can also drain away unhindered, do not forget to allow for a slight slope (around three to four percent) in the drainage system. This can be implemented with a screed layer. To prevent the accumulation of backwater, the slope should of course flow away from the house optimally into a drain (possibility of rainwater harvesting)!
Doing balcony renovation yourself - what to look out for?
Most mistakes when renovating a balcony occur when creating the slope and when sealing or connecting to the house. This is exactly where you should work very cleanly or, if necessary, let a balcony professional do it. Alternatively, there are already complete balcony systems in the trade. Often the later very costly moisture damage occurs there.
Paving a balcony with the help of a guide line
A guide line is indispensable for the following steps. This ensures that the alignment line is straight later on. When laying the paving stones, it is also a good idea to leave a gap of about three to four centimeters. As soon as the first three or four rows have been laid, chippings or paving sand can be scattered between the joints. This is for stability and better long-term durability.
Last but not least, once completed, pick up the vibratory plate again to provide additional strength. Then again follow a compaction of the joints with sand, and a slurry of the paving with water. And already the outdoor facilities shine in "new splendor".
Safety tips for balcony renovation
If you have the idea to use heavy new paving stones, you should in any case find out from your construction plans the maximum load capacity of your balcony and roughly compare it with the load of the new stones. No insurance company will bear any damage if it was caused by your own mistakes (too high load capacity) during the renovation.
Topics: building & Housing & Floodplain Facilities & Redevelopment


